
I love the squeals from children when they see these Halloween Marshmallow Pops and are so excited to get their hands on them. Believe it or not you don’t have to be 5 years old to have that same excitement with this fun Marshmallow Pops Treat, trust me. So grab a bag of Campfire Marshmallows and follow along to make these fun Candy Corn Halloween Marshmallow Pops.
This post and recipe was created for #HalloweenTreatsWeek! I was sent samples by some of the sponsors, Dixie Crystals, companies but as always opinions are 100% mine.
October is like the gateway to so many fun holiday traditions with food and activities in the months to come. It’s a time for family and friends to gather and make priceless memories.
I know there is a huge divide on if you love Halloween or just tolerate the antics but trust me, making these Candy Corn Marshmallow Pops are also perfect for any fall event.
When I first made these I thought it was going to be an all day affair, but honestly I was surprised to realize that as quickly as I was dipping one color the first ones were ready for second.
Ingredients:

Your Ingredient or Supply list is pretty simple.
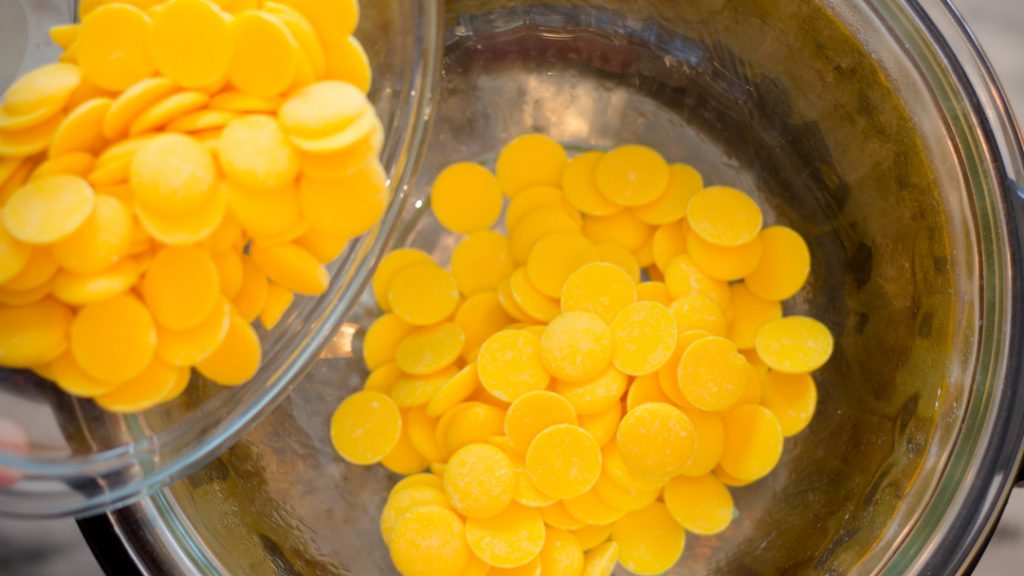
- 1 bag Wilton Yellow Candy Wafers
- 1 Bag Wilton Orange Candy Wafers
- 18-20 Giant Marshmallows – I used Campfire Marshmallows
- 18-20 Sticks
- 18-20 Bags with ties
Now, gather those little ones or even the big kids too and have them help because this is truly a recipe that they can do. I’m all about inviting people in the kitchen with me. Of course it’s easier to just do myself but life is meant to be shared and the memories that unfold are priceless.
How to Melt Candy Wafer
You have a choice right about now. You can choose to melt the Candy Wafers in the Microwave or use the Instant Pot Pressure Cooker. I’ve listed both, so choose what works best for you! Read through these instructions and make your choice. You will start with the Orange Candy Wafer first. No need to get both melted, let’s focus on one color at a time.
Microwave:
Add Candy Wafers to a glass bowl. It’s best to use a dish to tall sides or even a mug works great.
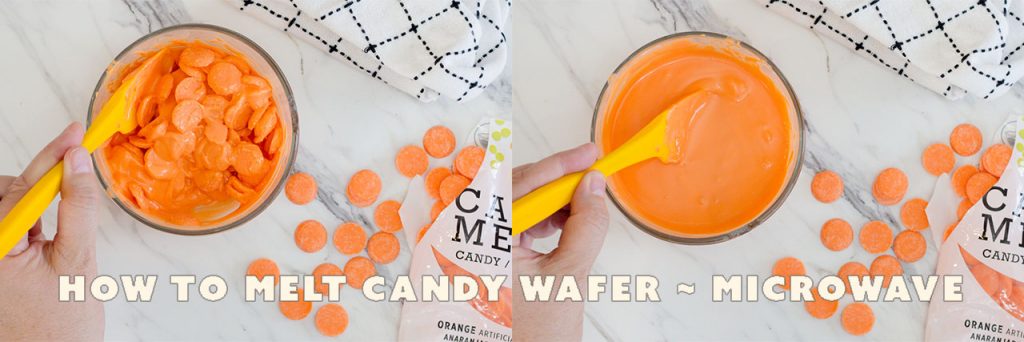
- Step 1: Heat for 30 seconds and then stir. At this point they won’t have melted much but you are stirring to move everything around so you don’t have hot spots
- Step 2: Heat for 30 more seconds and then Stir Stir Stir. As you stir more candy wafers will melt but you will still have plenty of large pieces and that’s okay.
- Step 3: Heat for 15 seconds more. You guested it, STIR! You do NOT want to over heat. It’s best to heat in 15 second intervals until mostly smooth. The last remaining candy wafers typically melt from the heat and stirring will result in a nice smooth melt.
Instant Pot / Pressure Cooker
I personally love this method and use the Instant Pot method when I’m melting an entire bag of Candy Wafers because it’s so fast and easy. You will need a large glass bowl. The bowl needs to be larger than the size. Of the Instant Pot / Pressure Cooker. The bowl will sit on top and not fit inside for reference.
- Step 1: Pour 2 cups of water into Instant Pot / Pressure Cooker
- Step 2: Place Glass Bowl on top of Instant Pot / Pressure Cooker
- Step 3: Press Saute and allow Instant Pot to heat up. The steam created from the boiling water will heat the glass bowl and melt the candy melts.
- Step 4: With a silicone spatula, stir. Stir until candy melts are melted
- Step 5: Press Cancel and set to “Keep Warm”. This mode will give just enough warmth to keep the candy melts smooth while you are dipping.
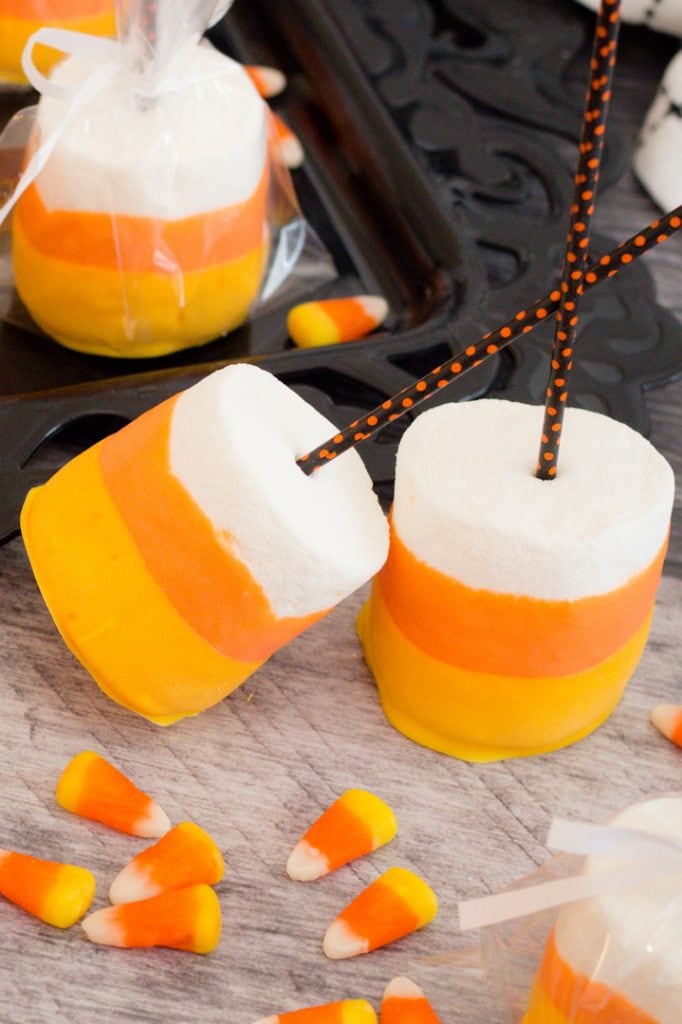
How to make Halloween Marshmallow Pops
Step 1: Now that you know how to melt candy wafers, lets get down to business. Poke sticks into each marshmallow. I poke sticks in ¾ of the thickness of the marshmallow to secure. Once you have all your sticks in place it’s time to melt the Orange Candy Wafers and begin dipping

Step 2: Place a piece of parchment paper on a cookie sheet. This is important! You need to be able to lift and peel the hardened candy wafer off of the pan easily and parchment paper is the key.
Step 3: Dip each Marshmallow one at a time. You want to cover 75% of the marshmallow leaving the top white. Don’t forget to allow the excess candy melt to drop off. Shake off what you can into the bowl or mug.
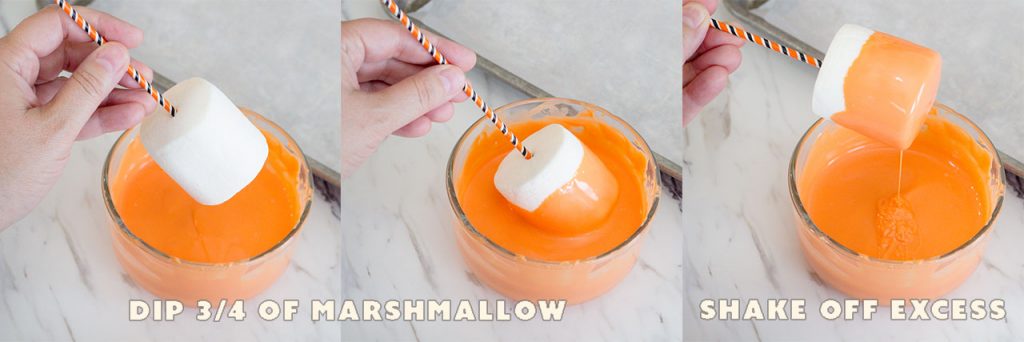
Step 4: You do NOT want excess melted candy wafer dripping and pooling on the bottom. Repeat the process until you have covered all the Marshmallows.
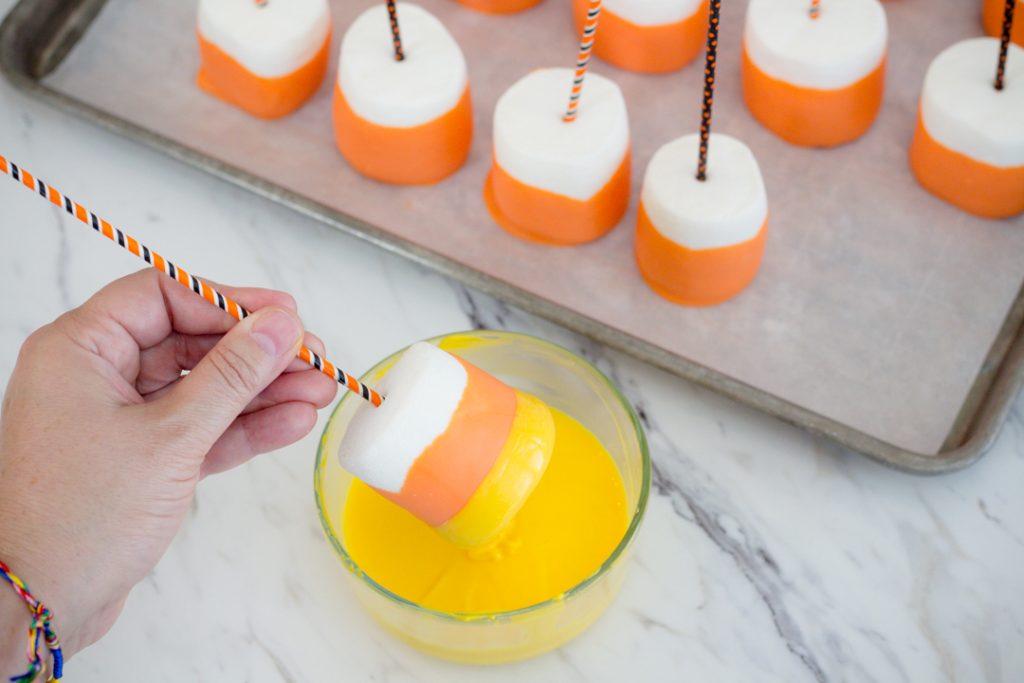
Step 5: Now it’s time to melt the Yellow Candy Wafer by your preferred method. Again, it’s important to use a bowl with tall sides or a mug works great too.
Step 6: Start with the first marshmallow you dipped in Orange candy wafers, It should be dry and ready for the yellow. Dip 25% of the marshmallow into the yellow coating so you can see a nice thick ring of orange.
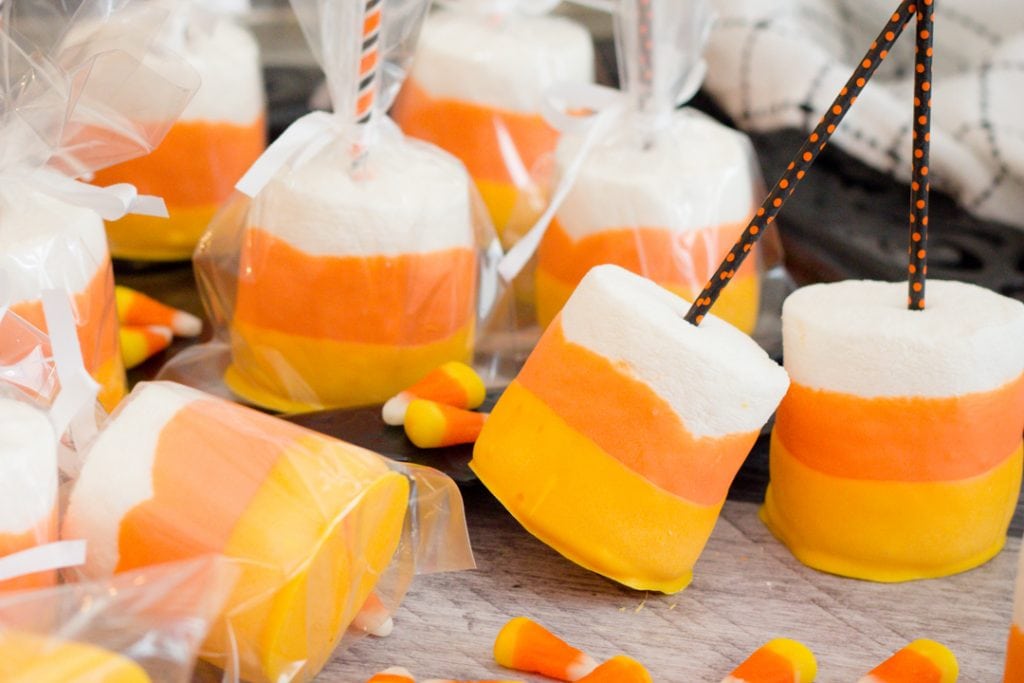
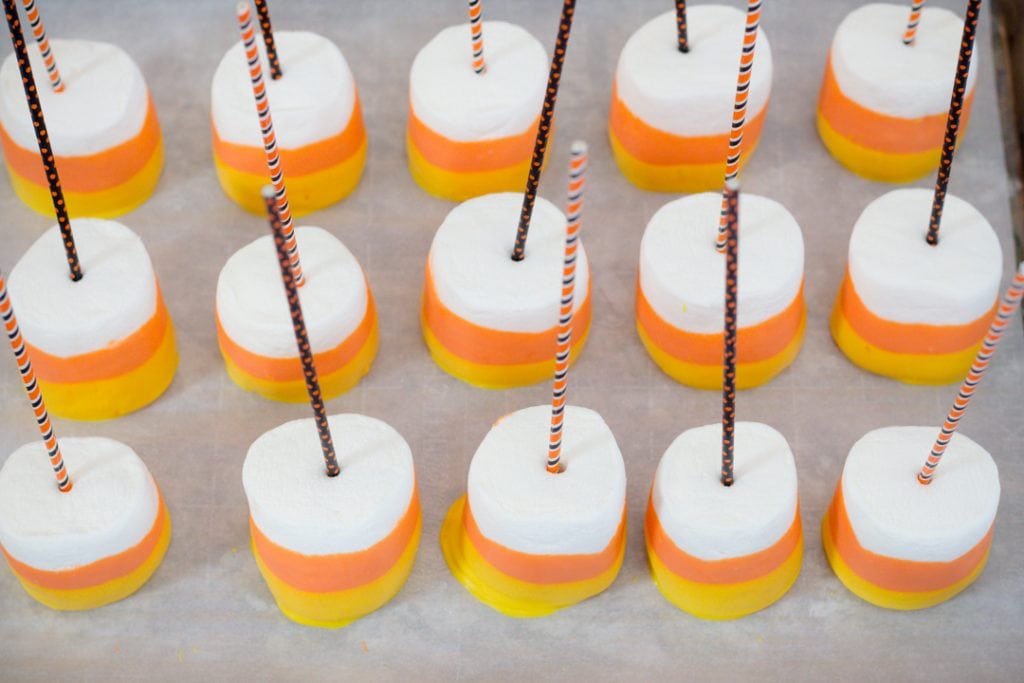
Step 7: Repeat with remaining marsh mallows and allow them all to fully harden before placing in bags. Wilton makes a real nice bag for Cake Pops that works nicely or a Candy Apple Bag could work. But even a Sandwich Baggie would work well.
Step 8: Wrap each marshmallow in a fun bag and tie with a ribbon. They are ready for your next event, party or just because. And trust me, they are super fun to “Boo” your neighbors with too! Leaving treats on doorsteps is a fun tradition.
Fun Fact:
Did you know that Halloween is the 2nd largest Commercial Holiday in the United States? Well it is, second only to Christmas. It's reported that 9 Billion, with a "B", was spent last year according to the National Retail Federation. Whoa, that's a lot of Candy, Costumes, and parties.
Quick Tip:
When melting Candy Wafers or Chocolate it’s important no water gets added. This will seize up the candy wafer and make it chalky. It’s also impossible to save once this happens. Be careful that steam does not collect on the spatula and fall into

Halloween Fun Treats
- Candy Bar Cookies ~ Use Leftover Halloween Candy
- Edible Cinnamon Roll Intestines
- Candy Corn Poke Cake
- Mummy Cookies ~ Made with Nutter Butter Cookies
- Halloween Snack Mix ~ Witches Hat, Skeleton Scabs, Bat Wings and More
- Halloween Pretzel Treat ~ Spooky Spider Web
- Monster Cookies
- Vampire Donuts
- Peanut Butter Spider Cookies from BigBearsWife
- Chocolate Almond Owl Eye Cookies from Savory Moments
- Halloween Sugar Cookies from House of Nash Eats
- Mini Mallowmar Candy Corn Cookies from Sweet ReciPEAS
- Chocolate Chip Spider Cookies from Fresh Coast Eats
- Black Cat Whoopie Pies from Strawberry Blondie Kitchen
- Pumpkin Spice Layer Cake from The Flour Handprint
- Flying Purple People Eater Cake Balls from The Spiffy Cookie
- Cream Cheese Brownies with Pumpkin from Back To My Southern Roots
- Pan de Muerto (Day of the dead bread) from Lemon Blossoms
- Eye of Newt Halloween Milkshake from It's Shanaka
- Halloween Marshmallow Pops from Devour Dinner
- Monster Mouths from Hezzi-D's Books and Cooks
- Spooky Peanut Butter Balls from Tastes of Homemade
- Spider Web Ice Cream Pie from An Affair from the Heart
- Halloween Fudge from Sweet Beginnings
- The Best Halloween Muddy Buddies Mix from Family Around the Table
- Halloween Treat Popcorn Balls from Karen's Kitchen Stories
- Halloween Charcuterie Board from I am a Honey Bee
- Air Fried Bat Wings from A Kitchen Hoor's Adventures

Halloween Marshmallow Pops
Ingredients
- 20 Campfire Marshmallows
- 8 ounces Orange Candy Wafer
- 8 ounces Yellow Candy Wafer
optional supplies
- 1 pkg Tall Sucker Sticks
- Plastic Bags
Instructions
Melt Candy Wafer ~ Microwave
- Step 1: Heat for 30 seconds and then stir. At this point they won’t have melted much but you are stirring to move everything around so you don’t have hot spots
- Step 2: Heat for 30 more seconds and then StirStir Stir. As you stir more candy wafers will melt but you will still have plenty of large pieces and that’s okay.
- Step 3: Heat for 15 seconds more. You guested it, STIR! You do NOT want to over heat. It’s best to heat in 15 second intervals until mostly smooth. The last remaining candy wafers typically melt from the heat and stirring will result in a nice smooth melt.
Melt Candy Wafer - Instant Pot / Pressure Cooker
- Step 1: Pour 2 cups of water into Instant Pot /Pressure Cooker
- Step 2: Place Glass Bowl on top of Instant Pot /Pressure Cooker
- Step 3: Press Saute and allow Instant Pot to heat up. The steam created from the boiling water will heat the glass bowl and melt the candy melts.
- Step 4: With a silicone spatula, stir. Stir until candy melts are melted
- Step 5: Press Cancel and set to “Keep Warm”. This mode will give just enough warmth to keep the candy melts smooth while you are dipping.
Making Halloween Marshmallow Pops
- Poke sticks into each marshmallow. I poke in ¾ of the thickness of the marshmallow to secure.
- Place a piece of parchment paper on a cookie sheet. You need to be able to lift and peel the hardened candy wafer off of the pan easily and parchment paper is the key.
- Dip each Marshmallow one at a time. You want to cover 75% of the marshmallow leaving the top white. Don’t forget to allow the excess candy melt to drop off. Shake off what you can into the bowl or mug.
- Repeat the process until you have covered all theMarshmallows.
- Melt the Yellow Candy Wafer by your preferred method. Again, it’s important to use a bowl with tall sides or a mug works great too.
- Start with the first marshmallow you dipped in Orange candy wafers, It should be dry and ready for the yellow. Dip 25% of the marshmallow into the yellow coating so you can see a nice thick ring of orange.
- Repeat with remaining marsh mallows and allow them all to fully harden
- Tip: Wilton makes a real nice bag for Cake Pops that works nicely or a Candy Apple Bag could work. But even aSandwich Baggie would work well.
Notes
Quick Tip:
When melting Candy Wafers or Chocolate it’s important no water gets added. This will seize up the candy wafer and make it chalky. It’s also impossible to save once this happens. Be careful that steam does not collect on the spatula and fall into Use a Mug or bowl with tall sides for dipping candy wafers. It's easier to cover ¾ in Orange with a bowl or much with tall sides. Wait until candy wafers are hardened before placing in plastic bags.Nutrition Disclaimer
All nutrition values are approximate and calculated by a plugin and are provided as a courtesy. Adding or subtracting ingredients will change the nutritional value.
Submit a Comment